Contribute
This is a tutorial on how to contribute to the package. Please do take note of the Note boxes, as they can contain important information and read the entire step before executing it.
GitHub
exp4-age is the GitHub organization that hosts the agepy package. After becoming a member you could also put your own projects there and collaborate with your team. It should be possible to create repositories private to the organization.
Create a GitHub account if you don’t have one yet.
Note
As ArVe mentioned in his group seminar talk, you can get a free GitHub Pro account through the GitHub Education program, which inlcudes access to the GitHub Copilot AI.
Ask one of the owners / maintainers (currently AdKr) of the agepy repository to add you to the organization and send them your username.
How to contribute
Clone the agepy repository to your PC:
git clone https://github.com/exp4-age/agepy.git
Note
If you are new to git, checkout the short git tutorial.
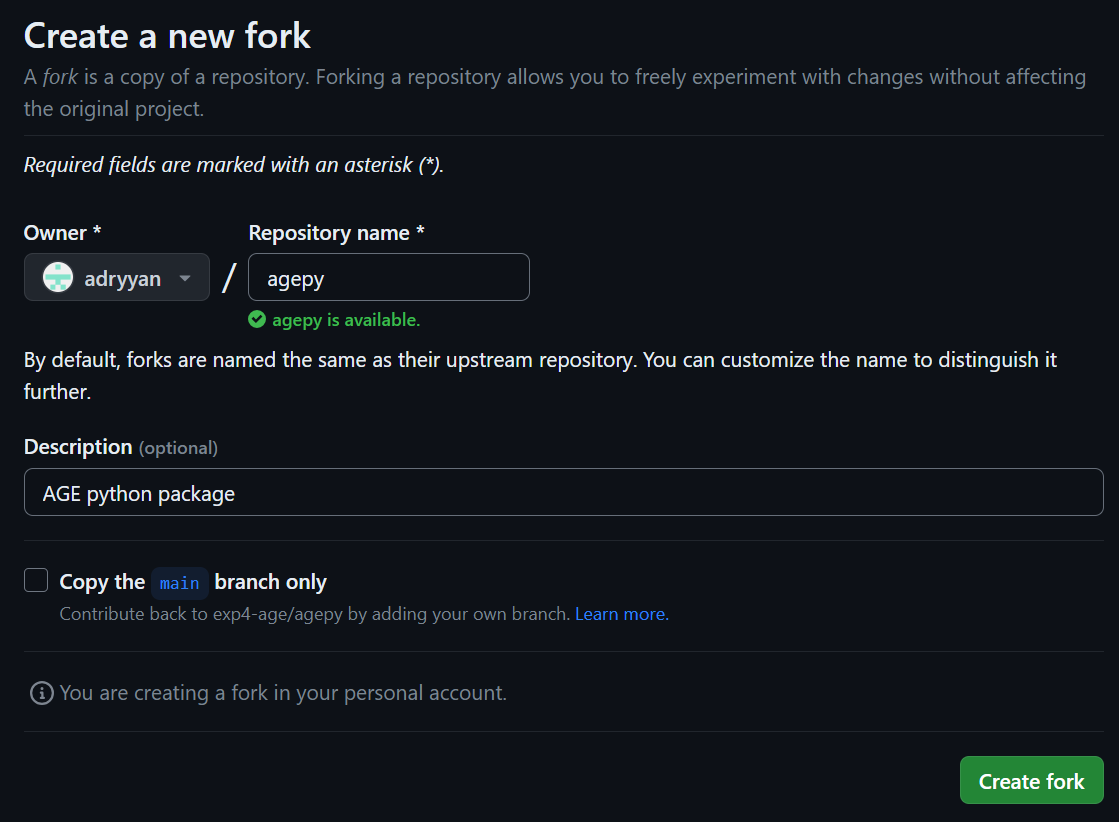
The agepy repository is protected, which means that you can’t push any changes to it. Therefore, create a Fork of the agepy repository. This creates your own copy of the repository, which is linked to the original. In order to do this click Create a new fork

on the agepy GitHub page and then Create fork after removing the checkmark from the Copy the main branch only option.
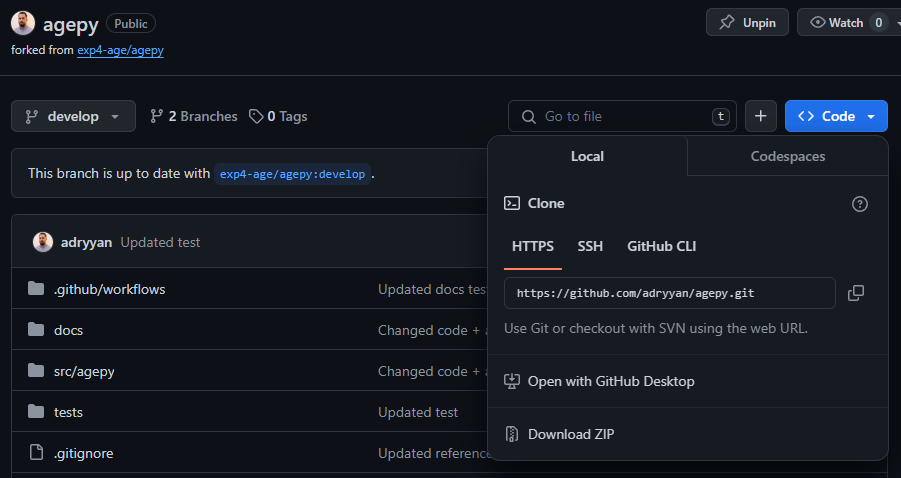
Move into the new agepy directory on your PC created in the first step and add your fork as a remote, so that you can push and pull to / from your Fork. Insert your GitHub username into
<username>and the copied link (see image) into<link to your fork>.git remote add <username> <link to your fork>
Note
<username>is just the name for the remote and you could give it a different name that makes sense to you.Setup a virtual python environment (conda, venv, …) and install the agepy package in editable mode:
pip install -e <path/to/agepy>
Replace
<path/to/agepy>with the path to your cloned repository. By doing this the package will be sourced from the code in your local git repository and any changes you make will be immediately present, when you want to test / debug them. If you want to build the documentation, then you also need to install the packages in thedocs/requirements.txtfile.Note
If you are using the Anaconda Navigator go to your environments, choose / create an environment, click on the play button and select Open Terminal and run the command.
Note
Here is a short introduction on Python virtual environments.
The repository has a main branch and a develop branch. The main branch should always contain the latest stable version of the package. When you contribute code, it will first be merged into the develop branch and then at some point with other changes into the main branch.
If you want to switch between the develop and main version, you can do so with
git switch <branch>
When you clone the repository, you only create a local develop branch. To also create a local main branch, you can do
git switch -c main origin/main
In theory you could work on the local main and develop branch, but I suggest that you don’t make any changes there and keep both branches in sync with the origin repository, so that you can easily return your installation to a functioning version. After switching to the
<branch>that you want to update, you can pull changes withgit pull origin <branch>
So before you make any changes and write code, you should create a new branch
git switch -c <name> origin/develop
Note
It might be useful to assign yourself to an open Issue on GitHub before you start working on implementing something. If there is no Issue on the topic, then you can open one yourself. This will signal to others that you are working on this topic. Once you open a Pull request, you can link to the Issue.
Once you have implemented your changes / new code, you can follow the usual git workflow by adding the changes
git add -A
creating a commit
git commit -m "<some descriptive message>"
pulling updates from the original repository
git pull origin develop
Note
If the changes, that you are pulling from the original repository, are not in conflict with your changes, you can use the
--rebaseoption to apply your changes on top of them. If there are conflicts, you will have to merge them.merging them if necessary and then pushing to your Fork with
git push <username>
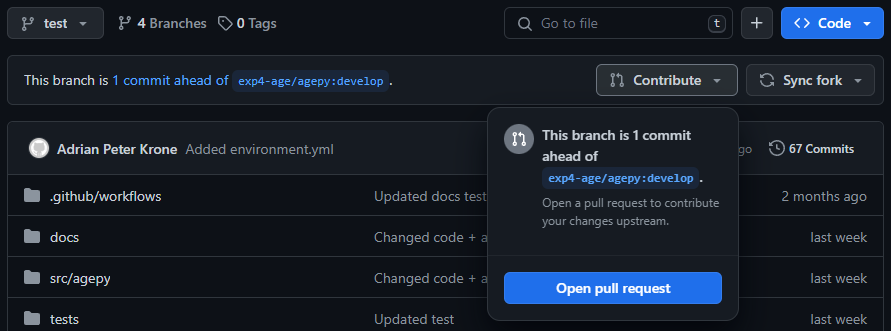
The changes are now only on your Fork and not in the original repository yet. But now you can open a Pull request from your forked repository on GitHub by clicking on Contribute and then Open pull request:
You can then write a few sentences about what you did and open the pull request. Everyone can then discuss the changes, suggest / make corrections and finally approve the Pull request. The Pull request will then get merged by an owner / maintainer.
Style guide
When writing code for the package, the style should match that of the the already existing code and should generally be easily readable.
Some guidelines are listed here:
Parameter names should be consistent between different functions where it makes sense.
Try follow the PEP 8 style guide as much as possible.
Maximum line length for code: 79 characters
Maximum line length for docstrings / comments: 72 characters
…
Note
You can use flake8 to lint your code. It will list all places in your code that don’t conform to the style and tell you what the problem is.
Provide a comment for every important line in your code.
Writing docstrings
For improved legibility, docstrings are parsed using the numpydoc extension. This means that the docstrings can and should be written in the same syntax used by NumPy:
def func(arg1, arg2):
    """Summary line.

    Extended description of function.

    Parameters
    ----------
    arg1 : int
        Description of arg1
    arg2 : str
        Description of arg2

    Returns
    -------
    bool
        Description of return value

    """
    return True
Note
The docstring needs to have an empty line at the end!
There are more sections that can be included in the docstring like Warnings, Raises, References, Examples, etc. (see full list in numpydoc).
Especially the Examples section can be quite helpful by showcasing how the function might be used:
def func(arg1, arg2):
    """
    ...

    Examples
    --------
    Explanation of what is happening.

    >>> from agepy.example import func
    >>> func(1, "Hello World")
    True

    """
The resulting section will look like this:
Examples
Explanation of what is happening.
>>> from agepy.example import func
>>> func(1, "Hello World")
True
If your example code contains the line
import matplotlib.pyplot as plt, you can create a plot in the
example, which will then be present in the documentation.
More comprehensive examples can be written in the form of Jupyter notebooks and added to the tutorials section.
Writing tutorials
Tutorials can be written in the form of a Jupyter Notebook in
the docs/_notebooks/ directory.